¶ Creating Interactive Elements with Wires
In this article, we'll learn how to create interactive elements using wires. Wires allow us to trigger something to happen when an alert fires.
Alerts are simply events that fire whenever something interesting happens such as a key is pressed or an internet data refresh occurs.
Our goal for this article is to have an Object Emitter emit a burst of objects whenever we press '1' on our keyboard. Let's start by creating the Object Emitter on our canvas.
¶ Creating the Object Emitter
- Click the + button located on the Scene Layout panel on the right-side of the screen.
- Select Object Emitter from the menu.
A new Object Emitter is added to your canvas inside a 3D Screen Layer. Let's look at its properties to configure it to emit something. First off, let's select a Source object that will be emitted.
- Click the prefab button located on the Source property.
- From the Prefab Browser that appears, choose an object by double-clicking it.
Nice. Next, if we keep looking through its properties, you'll notice that the emitter has two Actions: Emit Burst and Clear Objects.
- Click the Emit Burst action.
A bunch of objects should burst onto the canvas. Great! Now let's have this happen automatically whenever we press a button on our keyboard. To do this, we'll need to create a Hotkey in our Source Library.
¶ Creating the Hotkey
-
Open the Library panel by clicking the + button on the lower left side of the screen.
-
Click the + button located on the Library panel on the left side of the screen.
-
Select Hotkey from the menu.
A new Hotkey is added to your Source Library. Let's look at its properties located directly below. We can see that is has a property called 'Hotkey' that's currently set to [unassigned]. There's also two Alerts listed: onPress and onRelease. These alerts fire whenever the assigned button is pressed or released. Let's assign a button to see them work.
- Click [unassigned]
- Press '1' on your keyboard to assign the key to the Hotkey property.
Now press '1' a few times on your keyboard to see the Alerts fire. You should see both the onPress and onRelease alerts flash whenever you press and release the button.
¶ Wiring it up
We are now ready to wire the onPress alert of the Hotkey to the Emit Burst action of the Object Emitter.
-
Ensure the Object Emitter is still selected from the Scene Layout panel on the right side of the screen.
-
Left click and drag your mouse from the red socket next to onPress to pull out a wire.
-
While keeping your left mouse button clicked, pull and connect the wire to the flashing socket located next to the Emit Burst action on the right side of the screen.
Finally, let's test the result.
- Press '1' on your keyboard a bunch of times.
You should see items burst forth whenever you press the key. Success! You have now wired up your first interactive element.
¶ But there's more
Using this wiring technique, you can connect various alerts to properties and actions to create a multitude of useful, dynamic interactive elements.
When you drag a wire, any compatible property or action will display a flashing socket.
For instance you can:
- Connect Hotkeys to Scenes to switch to those scenes on a key press
- Schedule a live stream to happen a time of day is reached.
- Connect Alerts to Visible properties to show and hide objects on a key press
- Connect Alerts that contain text (such as a Twitter tweet alert) to Text properties to update the text with the Alert's contents.
¶ Wire Properties
In PolypopLive all wires have properties. These properties represent the change the action this wire is connected to (for example “on New Follower” Alert) will create when the alert is triggered.
The wire properties change according to the socket they are connected to.
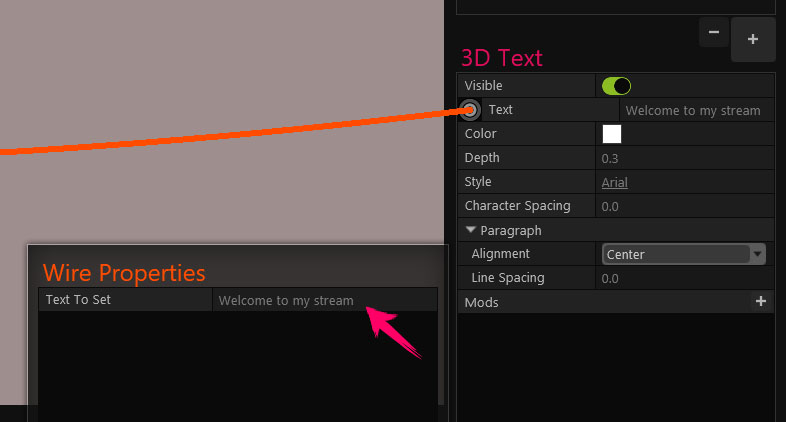
For example: if a wire is connected to a Text socket - the wire properties will show the text.

The wire properties when connected to a Text socket
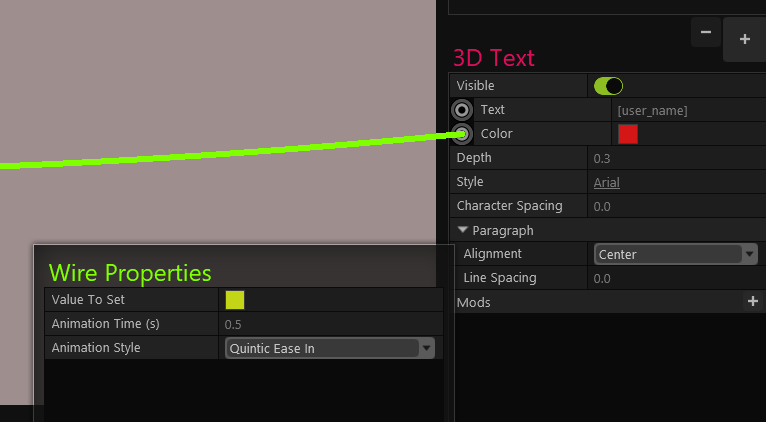
And when a wire is connected to the color socket - the wire properties will change accordingly and will present the Color, Animation time, and style. All Wire properties can be modified.

The wire properties when connected to a Color socket
All wires have properties except for:
- Wires to actions since it's just activating the action.
- Wires to bool (usually denoted true and false = on and off) since depending on the menu item you choose, it creates a specialized wire
¶ How to access the wire properties
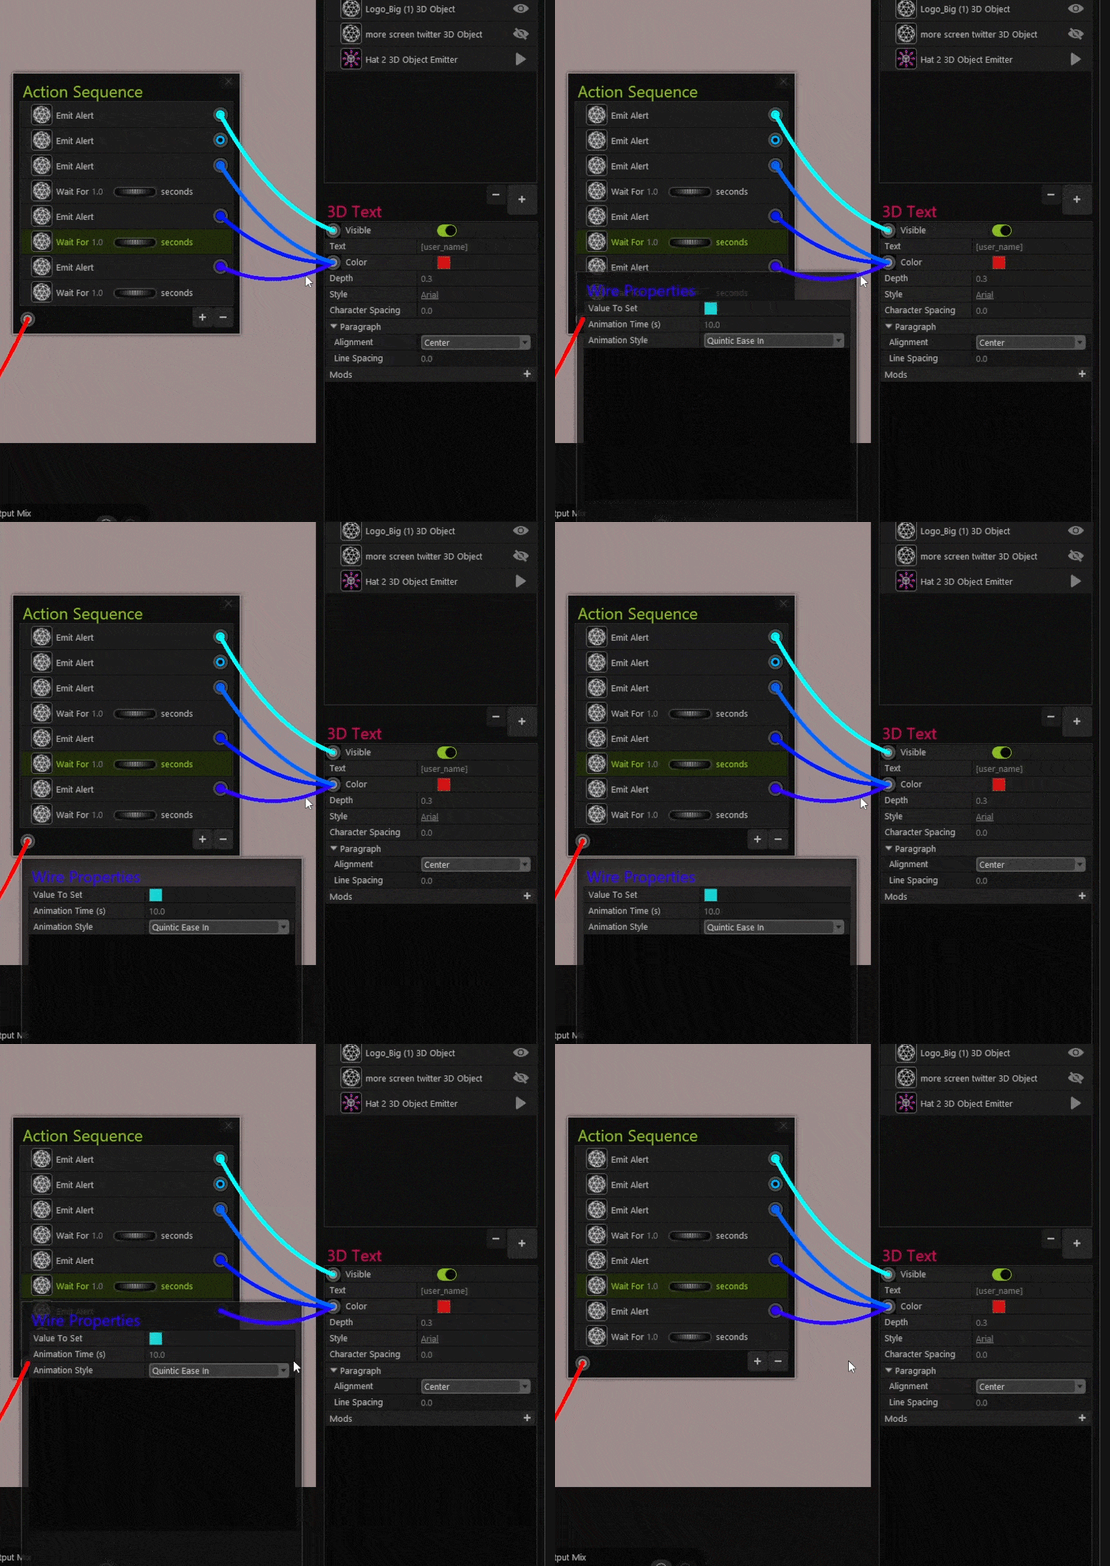
When you first connect a wire to a socket the Wire Properties will appear next to the Scene Layout properties.
If you want to make the Wire Properties appear again, click on the wire. This will make the Wire Properties window pop up.
