¶ Grouping layers
Grouping layers together allows you to organize the layers in your scene layout panel. This can be useful for keeping your scene organized and easy to navigate, especially if you have a large number of layers.
After you have grouped layers together in your scene, you can create visually interesting effects by adjusting the group's Blend Mode. For more information on this topic, please refer to the Blend Modes article.
Additionally, grouping layers together makes it easier to move all the layers within the group together, which can be helpful when creating advanced animations and alerts.
Grouping layers together also allows you to apply an Alpha Mask to the layers inside the group, which can further enhance the visual effect. For more information on Alpha Masking, please refer to the Alpha Mask article.
¶ Group Layers together
-
In the Scene Layout panel, select the layers you want to group together.
-
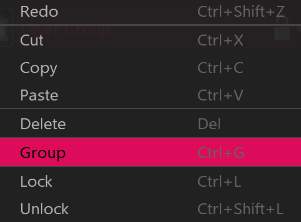
Press Ctrl+G on your keyboard or right-click on the layers and select "Group" from the menu.
This will group the selected layers into a single group layer, which you can then move and manipulate as a single entity.
¶ Ungroup layer
-
Select the group layer you want to ungroup.
-
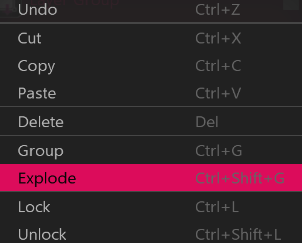
Press Ctrl+Shift+G on your keyboard or right-click on the group layer and select "Explode" from the menu.
This will ungroup the layers, removing the group layer and restoring the original layers to their individual state.