¶ Image Filters
PolypopLive offers an easy way to enhance the visual appeal of your scene through the use of image filters. By connecting your Twitch or YouTube alerts to these filters, you can create an interactive experience for your audience. Imagine allowing your viewers to control the image filters by making a donation, for example. This can add an exciting element to your live stream by temporarily altering the look of your scene, giving you a unique topic to discuss and react to.
When working with an image filter in a scene, it is important to note that the filter will affect all layers beneath the filter layer in that scene. However, if you wish to selectively apply an image filter to a specific source without affecting other layers, you can do so in the Crop and Filter mode. For more information on this, please refer to the Crop and Filter Mode article for guidance.
¶ Adding an Image Filter to your scene
-
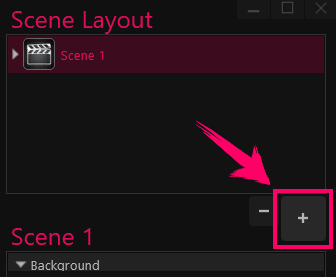
Click on the big + button in the Scene Layout panel.
-
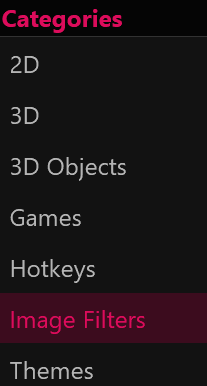
Select the Image Filters category from the menu.
-
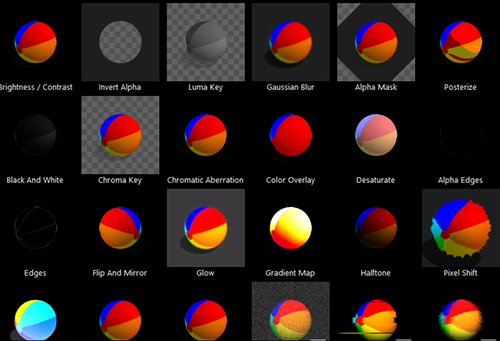
You Can now browse through the image filters. Double-click on the image filter you want to add to your scene.
-
An image filter was added to your scene. Accordingly, a new image filter layer was added to your Scene Layout panel.
Selecting the image filter layer in the Scene Layout panel will show you the layer’s properties.
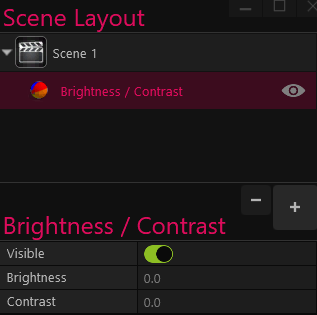
In this scenario, a Brightness/Contrast image filter has been added to the scene. By selecting the layer, you can access and adjust its properties.
You can add as many image filters as you want.
PolypopLive offers a variety of preinstalled image filters, as well as additional ones that can be added through specialized plugins. These plugins, which are tailored to specific themes, will seamlessly integrate their filters into the existing image filter category.
For more information on how to use plugins, please refer to the plugins article.