¶ Time Alerts
PolypopLive’s time alerts can be a valuable tool for enhancing your stream.
When connecting the time alerts to a 2D or 3D text layer, you have the ability to create a stopwatch or a countdown timer. You can fully customize the appearance of a timer by adjusting its color, font, depth, and other properties. This allows for a personalized and unique look to your project.
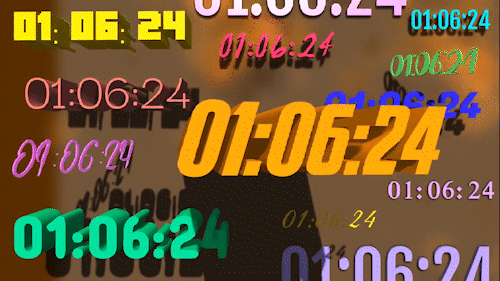
Here's an example of different types of timers that can be tailored to suit your specific needs.
There are 3 kids of Time Alerts in PolypopLive, each with its own unique purpose and function.
- Stopwatch Alert
- Repeating Alert
- Countdown Alert
This document will review all three.
¶ Adding the Time Alerts Plug-in
To have the Time Alerts available in your Library, you will first need to install the Time Aerts plug-in.
-
Click on the plug-in button, located at the top of the UI.

-
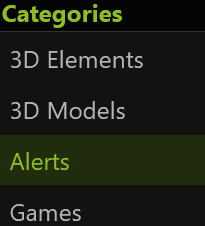
Select the Alerts category.
-
Find the Time Alert plugin and click its "Install" button.
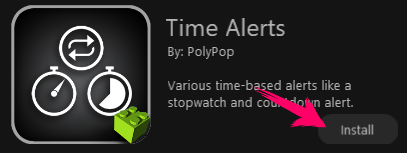
If you see that the Time Alerts plugin is marked as "Installed," it means you already have it and you don't need to install it again.
For more information on how to use plugins, please refer to the Plugins article.
¶ Stopwatch Alert
The Stopwatch alert, as its name suggests, is a tool that keeps track of time. It's a valuable addition to any stream as it helps to eliminate uncertainty for viewers about how long they may have to wait for the streamer to return. An active timer also adds a sense of professionalism to the stream, making it clear that the streamer is aware of the time and is actively working to return to the stream as soon as possible.
Adding a Stopwatch Alert
-
Open the Library by clicking the “Open Library” button on the lower left side of the screen.
-
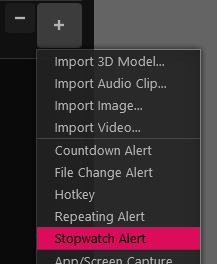
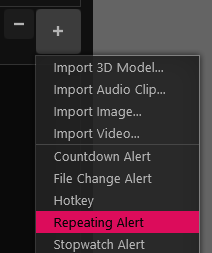
Click the + button on the bottom right of the Library panel.
-
Next, from the menu that appears, select “Stopwatch Alert”. (If you don’t see this alert, it means you need to install the Time Alerts plugin)
-
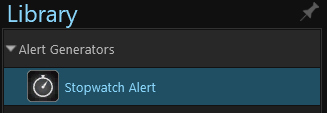
You can find Stopwatch Alert you added in the Library under the “Alert Generators” category.
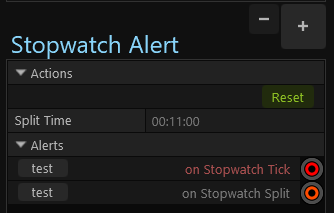
Stopwatch Alert Properties
To see the Stopwatch alert properties make sure the Stopwatch Alert is selected in the Library Panel.
-
Reset
Clicking on the “Reset” button under the “Actions” menu will reset the time in the Stopwatch Alert. -
Split Time
The Split Time feature allows you to divide the time recorded on the stopwatch into segments. You can set the duration of each segment, called the "Split Time", to any value you want. When the stopwatch reaches the Split Time, the "on Stopwatch Split" text will flash and if the "on Stopwatch Split" socket is connected to an actionable item, such as an emitter, it will activate that item. This means that the emitter will be triggered each time the Split Time is reached. -
Alerts
-
”on Stopwatch Tick” - This Alert will fire an alert on each stopwatch Tick - meaning every second.
Connecting this socket to a 2D or a 3D text layer will create a Timer. -
"on Stopwatch Split" - This alert is triggered every time the Split Time set on the stopwatch is reached. If you connect this alert to an action, such as the "play" action of an audio layer, it will activate that action, creating a sound, each time the Split Time is reached.
-
¶ Adding a Stopwatch Timer to your project
-
Add a Text layer
Before adding a Stop Watch alert, let’s add a text layer so we can visually see the passing of time.
To do this, we can use a 2D or 3D text layer. Here are the steps to add a 2D text layer:- Click on the "+" button in the scene layout panel.
- Select the "2D" category.
- Double-click the "2D Text" icon to add it to your scene.

- You now have a new 2D Text layer in the Scene Layout panel that can be used to display the time.
-
Now let's connect the Stopwatch Alert to the 2D text layer by pulling a wire from the “on Stopwatch Tick” socket in the Library panel to the 2D Text layer’s “Text” socket.
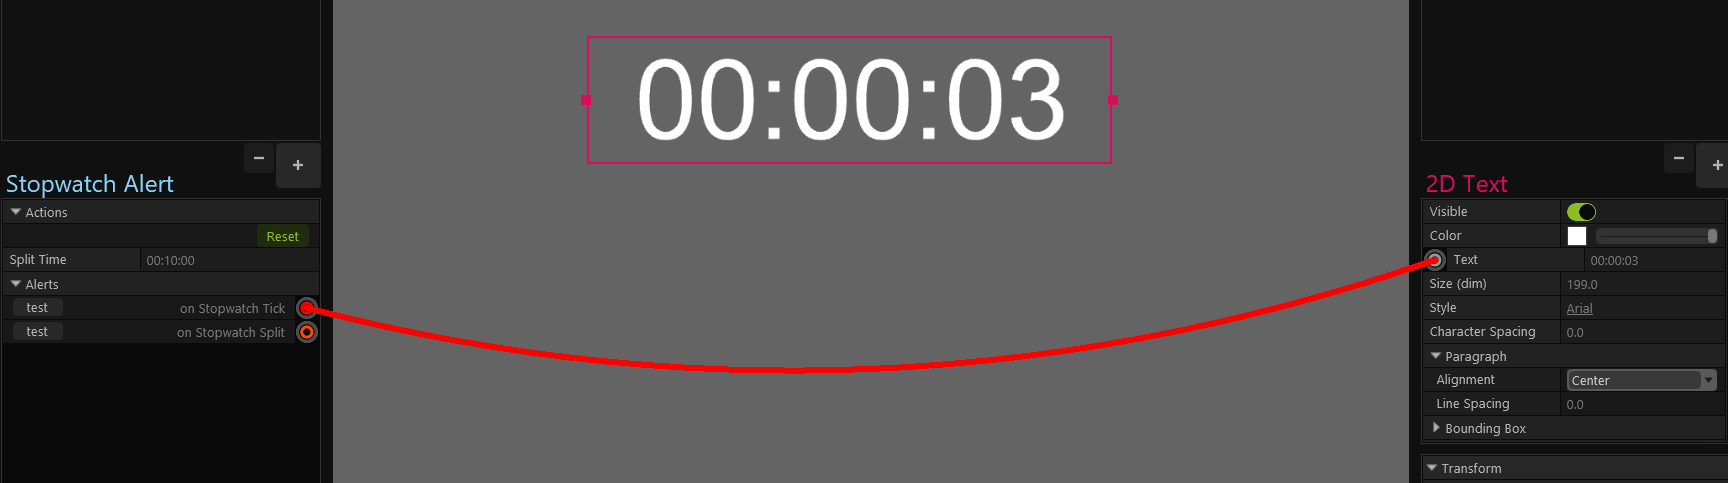
By wiring the Stopwatch Alert to the 2d Text layer, we’re letting the time data flow from the Stopwatch Alert to the text layer. The text layer will display the time recorded by the stopwatch. If you wish to start a new count, you can easily do so by clicking the "Reset" button in the Stopwatch Alert properties. -
You can customize the text layer’s appearance by changing its properties.
¶ Repeating Alert
A Repeating Alert is a powerful tool for creating dynamic animations and effects that repeat seamlessly. Whether you're looking to emit bursts of objects, play a repeating sound effect, or execute a sequence of actions, the Repeating Alert can be easily connected to a single element or to an action sequence to achieve your desired result.
Adding a Repeating Alert
-
Open the Library by clicking the “Open Library” button on the lower left side of the screen.
-
Click the + button on the bottom right of the Library panel.
-
Next, from the menu that appears, select “Repeating Alert”. (If you don’t see this alert, it means you need to install the Time Alerts plugin)
-
You can find the Repeating Alert you added in the Library under the “Alert Generators” category.
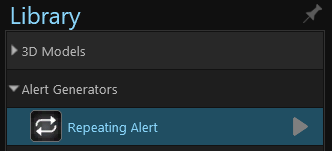
Repeating Alert Properties
To see the Stopwatch alert properties make sure the Stopwatch Alert is selected in the Library Panel.
-
Active
This toggle button controls whether the Alet is active or not. -
Interval(s)
Sets the average time between alerts (in seconds). -
Randomness(%)
Adds a level of unpredictability to the intervals. By adjusting the randomness value, you can control the degree of deviation from the set interval. A value of zero will result in the interval being hit precisely every time, while a higher number will increase the degree of randomness. -
Alerts - “on Alert”
The “on Alert” socket will trigger an alert at regular intervals. When connected to an action, (such as a "burst" action in an emitter) or an action sequence, it will initiate the designated action at each interval.
¶ Countdown Alert
The Countdown Alert is a versatile tool that can be used for a variety of purposes, such as creating a countdown clock before going live or adding a countdown for an alert effect. Using a countdown timer on a "starting soon" scene can help communicate to viewers that the streamer is aware of the time and is actively preparing to start the stream. Additionally, incorporating a countdown into an alert, such as a "be silent", can help engage viewers by providing clear information about what is happening and how long it will last.
Adding a Countdown Alert
-
Open the Library by clicking the “Open Library” button on the lower left side of the screen.
-
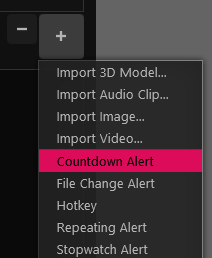
Click the + button on the bottom right of the Library panel.
-
Next, from the menu that appears, select “Countdown Alert”. (If you don’t see this alert, it means you need to install the Time Alerts plugin).
-
You can find Countdown Alert you added in the Library under the “Alert Generators” category.
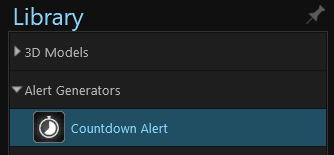
Countdown Alert Properties
To see the Countdown alert properties make sure the Countdown Alert is selected in the Library Panel.
-
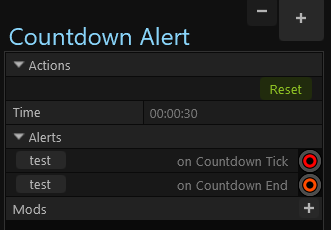
Actions - Reset
This button resets the Countdown Alert time. -
Time
Sets the time for the Countdown Alert. -
Alerts
-
”on Countdown Tick” - This Alert will fire an alert on each Countdown Tick - meaning every second.
Connecting this socket to a 2D or a 3D text layer will create a Timer. -
"on Countdown End" - This alert will trigger when the countdown reaches zero, providing an opportunity to add a special animation or sound effect to signal the end of the countdown. This can help create a more interactive and engaging stream experience for both you and your viewers.
-
-
Mods
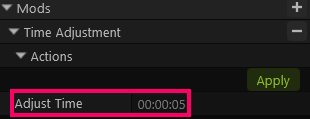
You can add a “Time Adjustment” mod to the Countdown Alert by clicking on the “+” button next to the Mods line.

Let's examine the Tiem Adjustment mod:
¶ Countdown Alert Time Adjustment Mod
The Time Adjustment Mod for Countdown Alert allows you to add or subtract time from the countdown timer, providing a useful tool for managing interactive streams such as marathons or Subathons. This feature can be used to adjust the remaining stream time based on subs or donations, helping to keep the stream engaging and dynamic.
To Adjust the time in the Countdown Alert
You can easily adjust the time by changing the value in the Adjust Time field. A positive value will add time to the countdown timer, while a negative value will decrease the time.
¶ Connecting a Youtube or a Twitch alert to the Time Adjustment mod
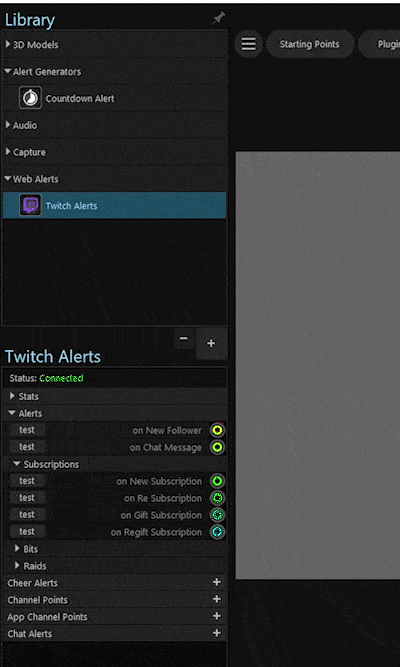
To give your viewers the ability to control the time adjustment of your countdown timer, you can connect a YouTube or Twitch alert to the Time Adjustment action. This allows viewers to affect the timer through actions such as subscribing, donating, or following. This example will show you how to connect a Twitch New Subscriber alert.
To connect a YouTube or Twitch alert to the mod you will first need to connect PolypopLive to these web services.
To learn how to connect to YouTube please refer to the Connecting to Your YouTube Account article.
To learn how to connect to Twitch please refer to the Connecting to Your Twitch Account article.
Connecting an “on New Subscription” alert to the time adjustment mod
-
Select the Twitch alert layer in the Library panel.
-
Drag a wire from the “on New Subscription” alert socket and pull it up to hover above the “Countdown Alert” layer. This will open the “Countdown Alert” properties.
-
Once the “Countdown Alert” properties are visible, connect the wire to the “Apply” socket of the “Time Adjustment” mod.
-
Now, each new subscriber will trigger the time adjustment mod, and adjust the countdown timer accordingly.
¶ Adding a Countdown Timer to your project
Before adding a Stop Watch alert, let’s add a text layer so we can visually see the passing of time. To do this, we can use a 2D or 3D text layer.
-
Here are the steps to add a 2D text layer:
- Click on the "+" button in the scene layout panel.
- Select the "2D" category.
- Double-click the "2D Text" icon to add it to your scene.
- You now have a new 2D Text layer in the Scene Layout panel that can be used to display the ti
-
Now let's connect the Countdown Alert to the 2D text layer by pulling a wire from the “on CountdownTick” socket in the Library panel to the 2D Text layer’s “Text” socket.
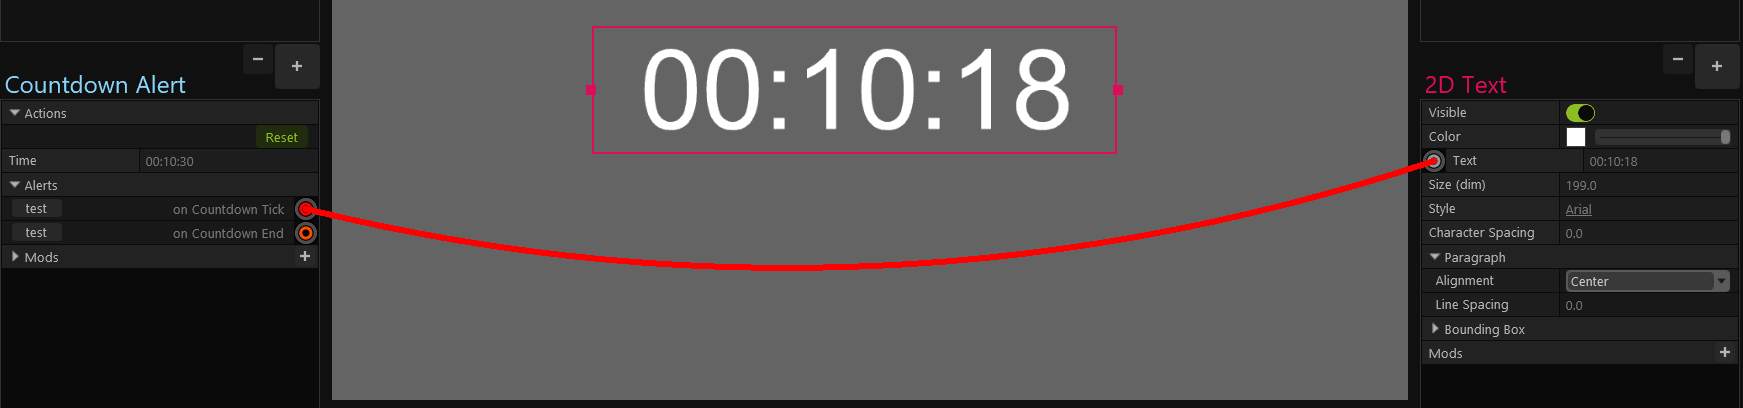
By wiring the CountdownAlert to the 2d Text layer, we’re letting the time data flow from the CountdownAlert to the text layer. The text layer will display the time recorded by the Countdown. If you wish to start a new count, you can easily do so by clicking the "Reset" button in the Countdown Alert properties. -
You can customize the text layer’s appearance by changing its properties.